Think Swiss Army knife, but for making. You feed it paper, vinyl, fabric, even thin wood, and it slices, scores, engraves—clean, cocky, fast. You swap tools like a pro: Rotary for fabric, Knife for basswood, pen for labels. Print then Cut? Yes, stickers that kiss-cut on command. You drive it in Design Space, Bluetooth on, mats locked. Bold claims, sure. Want proof—and the one setup mistake that ruins everything?
Key Takeaways
- Cuts a wide range of materials from cardstock and vinyl to fabric, leather, chipboard, and thin woods using the correct blade.
- Swappable Adaptive Tool System: fine-point, deep-point, rotary, knife, scoring, perforation, wavy, engraving, and deboss tips for cutting, folding, and texturing.
- Performs Print Then Cut to contour-cut printed designs precisely using calibration and registration marks.
- Scores, engraves, debosses, and creates crisp folds, tags, and acrylic charms; can flatten or repair frayed or warped pieces.
- Works with Design Space for project setup, presets, Bluetooth connectivity, testing, and calibration to ensure accurate, repeatable results.
Materials the Cricut Maker Can Cut, Score, and More

Some days you need paper; other days you want power. You push the Maker to slice cardstock clean, then bully vinyl, iron-on, and sticker paper like they owe you money. It chews through felt and fabric without whining. Thin woods? Yes, balsa and basswood. Chipboard and matboard? Bring it. Leather? Stop pretending you’re scared. Acetate for windows, foil poster for drama, Kraft board for grit. You score folds that snap crisp. You engrave tags, foil accents, and acrylic charms, because subtle is boring. And you care—sustainable sourcing matters, and material longevity keeps projects alive, not landfill-bound. Test scraps. Dial settings. Demand precision. If it frays, you fix it. If it warps, you flatten it. You’re the boss. Act like it. Right now. No excuses.
Essential Tools and Blades in the Adaptive Tool System
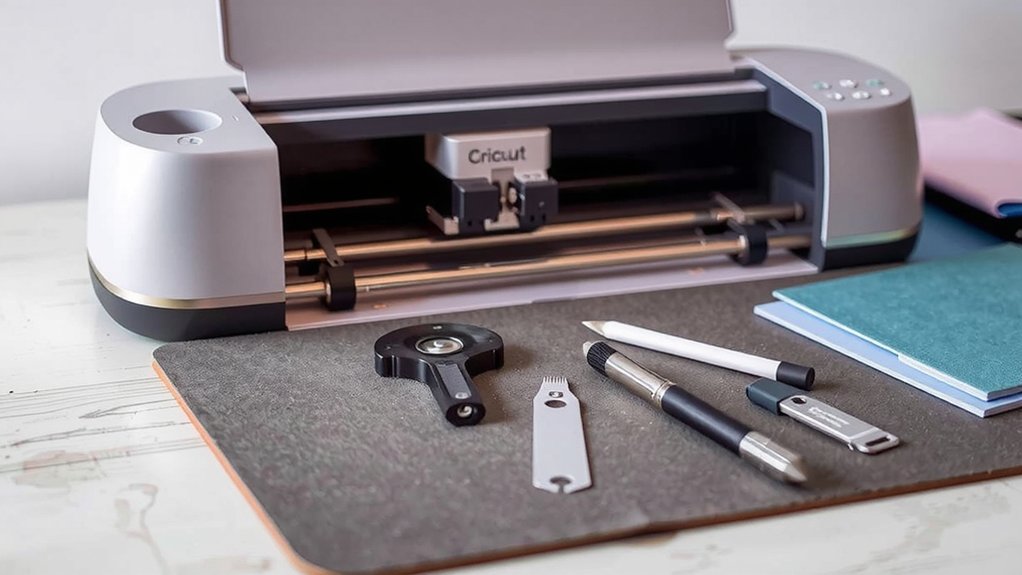
Arsenal first, excuses later. You’ve got the Adaptive Tool System, so act like it. Snap in what the job demands. Fine‑Point for cardstock. Deep‑Point when it’s tough. Rotary Blade slices fabric like it owes you money. Knife Blade? Thick stuff, clean cuts, no whining. Score with Single or Double Scoring Wheel—folds so crisp they clap back. Need texture? Wavy Blade for playful edges. Need control? Perforation Blade tears on command. Get loud—engraving tip etches metal and acrylic. Deboss tip presses detail that pops. QuickSwap makes tool interchangeability stupid simple: one housing, many tips, seconds to swap. Keep accessory storage tight—no lost caps, no mystery nicks. Load the right tool, set pressure, test cut, then send it. Precision isn’t optional. It’s the point. For real.
How “Print Then Cut” Works for Stickers and Labels
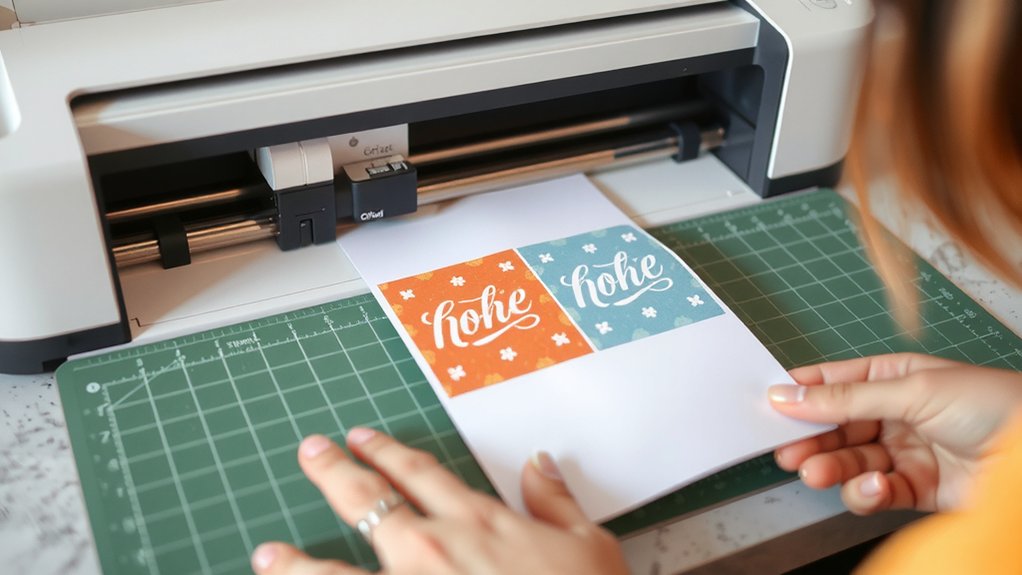
You want crisp stickers? Then you nail design and calibration first—build clean shapes in Design Space, run that calibration or your cuts will wander like drunk scissors. Crank your printer settings like you mean it, pick the right paper, turn on bleed for a tiny color halo or watch white slivers ruin your day—your choice. Then force perfect cut alignment with the registration marks and the right mat, match materials to the blade, and stop blaming the machine when cheap vinyl slips and trashes your labels.
Design and Calibration
Before you waste ink and wreck sticker paper, learn how Print Then Cut actually behaves. You design like a boss, or you suffer. Build clear art. Flatten every decorative layer to a single printable image. Keep cut lines sharp and simple. Respect size limits. Respect margins. Nail Font pairing for titles and notes, then enforce Layout hierarchy so eyes land exactly where you want. Big label, small subtext, obvious icon. Boom.
Now calibrate. Yes, every time things look off. Print the calibration sheet, stick it square on a green mat, load it straight, lights on, shadows gone. Let the sensor read the box, then tell the app which lines hit center. Nudge. Test. Repeat. Two minutes save twenty stickers. You’re welcome. Every. Single. Time.
Print Settings and Bleed
When ink meets sticker paper, print settings decide your fate. You either tame color or you watch it riot. Set Color Profiles like you mean it—sRGB for bold pop, CMYK-converted art for predictable tone—because your printer doesn’t read minds. Crank quality to high. Slow the pass. No economy mode. You want clean edges? Then use Bleed Margins. Add that halo, let ink spill past the edge so the trim kisses color not white scars. Scared of waste? Don’t be. Fear ghost lines instead. Test a single sheet. Look for banding. Too dark? Pull saturation. Too dull? Nudge contrast. Glossy sheet? Cool the black. Matte? Warm it up. And lock scaling at 100%. No shrinking. No “fit to page.” Own the print. Right now. Go.
Cut Alignment and Materials
Ink looks right? Good. Now prove it. Print Then Cut lives or dies on alignment. Your Maker reads black registration boxes, then slices. Missed marks? That’s you, not fate. Use matte sticker paper; glossy glares and confuses the sensor. Dry ink. Like actually dry. Calibrate the cut. Yes, every time a new pack arrives. Load a clean StandardGrip mat, press hard edges with a brayer, kill bubbles. Surface friction matters; slippery sheets wander, the blade hunts, and your kiss cut becomes a crime scene. Ambient humidity swells paper and wrecks scale. Control it or enjoy ovals posing as circles. Good lighting. No shadows. Fine‑point blade for kiss cuts, more pressure for cardstock labels. Test squares. Adjust offsets. Then cut like you mean it today.
Design Space Workflow and Wireless Connectivity
You open Design Space, blast through project setup steps, and stop stalling—pick a canvas, set your mat, choose materials, cut. You want insurance? Cloud saves and sync keep your files alive across devices, so lose the laptop, not the design. Bluetooth pairing tips? Easy—pair in settings, stay close, kill interference, and if it still glitches, you move, not the Maker.
Project Setup Steps
From the jump, stop guessing and set up the project like you mean it. Open Design Space. Clear the mess. Workspace organization matters, or your blade will bully you. Pick your machine. Pick your mat. Load the right material preset, not the fantasy one. Size the art, mirror if needed, and run a ruthless Time estimation. Bluetooth on. Pair it. Test cut. Don’t beg the vinyl later.
| Step | Action |
|---|---|
| Prep | Calibrate blade, check mat grip |
| Design | Arrange layers, set Attach/Weld |
| Material | Select preset, adjust pressure |
| Connection | Enable Bluetooth, confirm device |
| Cut | Load, test, then commit |
Hit Make It. Watch the preview like a hawk. If it looks wrong, it is. Fix it fast. You’re the boss, not the mat. Send it. Win the cut.
Cloud Saves and Sync
Why gamble a masterpiece on one cranky laptop when Design Space will stash it in the cloud and sync it everywhere?
Close the lid. Open your phone. Boom, your canvas loads.
Autosave catches flukes before they torch hours.
You tweak a font at lunch, finish the cut at home, no drama.
Need a redo? Version History laughs at panic and rewinds mistakes.
Share a link, don’t babysit files.
Invite a teammate, set edit or view, and mean it.
Privacy Controls lock down the nosy neighbors and that one oversharing cousin.
Lose the laptop, keep the work.
Switch devices without a sigh.
Stop coddling folders. Start creating, relentlessly.
The cloud is your backup, your bodyguard, your alibi when hardware throws a tantrum.
No excuses left.
Bluetooth Pairing Tips
Cloud safety net secured, it’s time to cut the cord—literally—and go wireless without the drama. You want speed. You want clean cuts. Then nail the pairing sequence. Power the Maker. Open Design Space. Hold the button. See it pop up. Tap pair. Done? Not if your kitchen router screams. Practice interference avoidance. Kill extra Bluetooth gadgets. Move metal mats away. Keep five feet of air. Then try again, like you mean it. No excuses.
| Power Maker | Enable Bluetooth |
|---|---|
| Open Design Space | Select your Maker |
| Press pair button | Confirm the code |
Now test a quick cardstock cut. Watch latency. If it stutters, reboot phone, then the Maker, last the app. Ruthless order. Still glitchy? Reset Bluetooth cache. You’re in charge. Act like it. Right now.
Mats, Settings, and Setup for Clean, Accurate Cuts
Although you want perfect cuts, your Cricut won’t deliver unless you stop winging the prep. Clean mat. Right mat. Sticky enough or you’re kidding yourself. Green for vinyl, blue for paper, purple for grip monsters. Use a brayer. No bubbles. Tape edges for curl bullies. Align to the top-left, then load straight.
Pick the exact material in Design Space. Fine-Point for cardstock, Knife for thick board, Rotary for fabric. Calibrate. Test cut every new sheet. Bump pressure one notch if corners snag, drop it if edges fuzz. Replace dull blades; they lie.
Clear crumbs from rollers. Park star wheels wide for delicate stuff. Fix your Ergonomic Layout. Better Workspace Lighting. Square your machine. Measure material. And for mercy’s sake, mirror iron-on. Do it today.
Project Ideas Across Paper, Fabric, Leather, and Wood
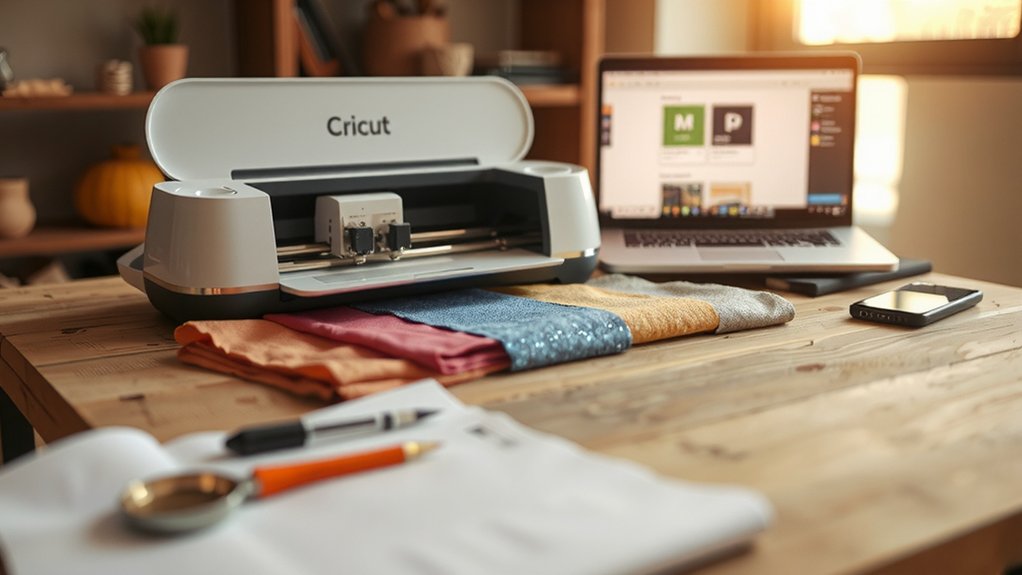
How many project ideas can you ignore before your Maker starts judging you? You want paper thrills. Fine. Slice bold decals, pop-up cards, banner letters that shout. Then fabric. Cut quilt blocks that actually match. Applique shapes so clean your iron blushes. Leather next. You crave grit. Punch cuffs, wallets, Functional Jewelry that snaps attention. Wood? Thin basswood bends to your will. Coasters. Signs. Miniature Models that flex precision and ego. You stall. The Maker doesn’t.
| Material | Bold Idea | Why it slaps |
|---|---|---|
| Paper | Pop-up card | Drama without bulk |
| Fabric | Patchwork set | Match fast cut faster |
| Leather | Snap cuff | Rugged. Sharp. Yours. |
| Wood | Desk sign | Grain plus authority |
Stop scrolling and cut something now; your ideas won’t wait, and neither will greatness. Own it today.
Tips for Maintenance, Calibration, and Safety
You flexed with paper, fabric, leather, wood—nice trophies. Now prove you can keep the Maker sharp. Set a Cleaning Schedule. Weekly. Wipe rails, purge dust, de-gunk the blade housing, wash mats before they turn into lint traps. Replace dull blades; stop pretending pressure fixes everything. Calibrate. Run the alignment tool, test-cut squares and circles, fix drift before it wrecks a paid project. Store blades capped, pens tip-up, mats flat. Ventilate when cutting vinyl; fumes aren’t aromatherapy. Electrical Safety isn’t optional: inspect cords, no frayed drama, use a surge protector, unplug before swaps. Keep liquids away. No coffee baptisms. Fingers too. Stay clear of the carriage. Kids watch, not poke. Firmware updates? Do them. Loud grinding? Stop. Diagnose, don’t bulldoze. Call support if jams persist.